 Tendrl
Getting Started with the MicroPython Client
Go from unboxing a microcontroller to publishing sensor data in minutes. The client handles WiFi, MQTT, NTP sync, offline storage, and reconnection; you just write your sensor logic.
Requirements: MicroPython 1.19+, WiFi or Ethernet capable board
Supported Hardware#
The client runs on ESP32 (all variants), the Raspberry Pi Pico W, and OpenMV camera boards. Which one to pick depends mostly on how much on-device storage your application needs. A board that only publishes readings has different requirements from one that keeps weeks of history and queries it locally.
Supported boards has the measured memory figures for every board, what each one can and can't do, and a walkthrough of which features need which hardware.
Quick version: the ESP32-C3 (~$2) is the best value we've measured and runs everything except camera work. OpenMV boards are the only ones with a camera. The Raspberry Pi Pico W works well for plain telemetry but cannot run the local database.
Install#
OpenMV boards have no on-device mip
Standard MicroPython firmware (ESP32, Pico W, …) includes the mip package installer, so the on-device install methods below work as written. OpenMV firmware doesn't include mip, so on OpenMV use a mip-free path: the Device tab or tendrl-dev-mcp (serial push, below), or run mip from your computer with mpremote mip install https://app.tendrl.com/api/public/sdk/v1/latest/mpy/package.json (it copies files over USB, no on-device mip or Wi-Fi). The mip-based install_script.py and the MCP install_client Wi-Fi install path do not run on OpenMV for the same reason.
From the Contact dashboard (Device tab)#
The fastest path, and the one that needs nothing installed on your computer. Open an MQTT-enabled entity in the dashboard, switch to the Device tab, plug your board into USB, and click Connect Device. Contact auto-detects the board, recommends an install tier from its free heap, writes the entity's API key and your Wi-Fi to /config.json, and installs the SDK.
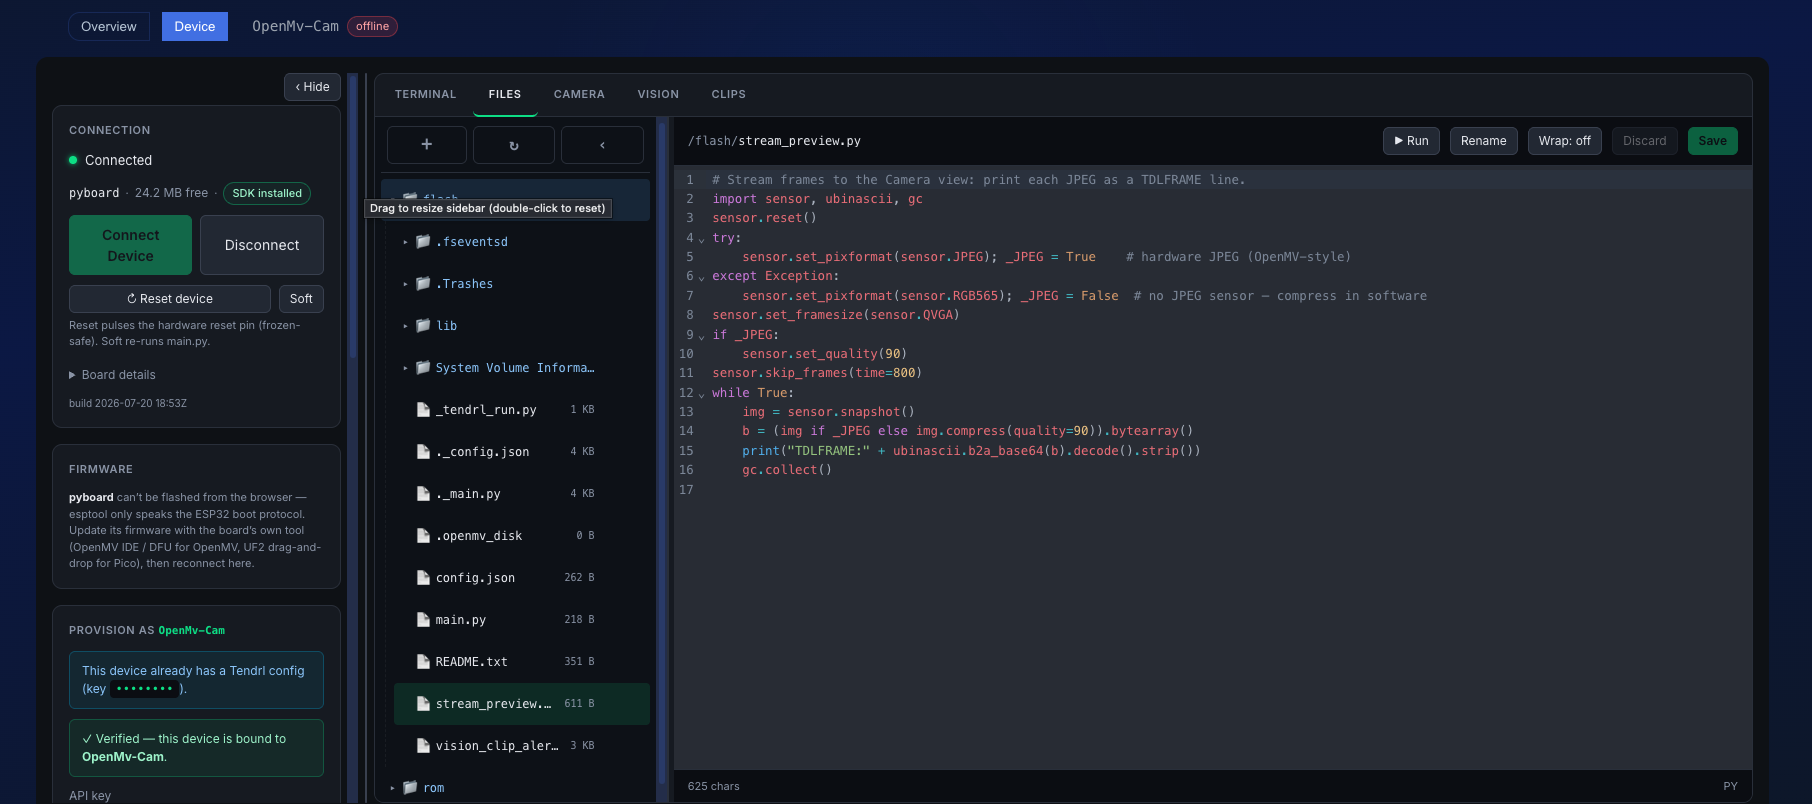 The Device tab: connect, provision, and the file / terminal / camera workspace.
Beyond provisioning, the tab is a full device workbench: firmware flashing, a live terminal, a file browser and editor, camera and clip previews, and a playground for tuning on-device detectors. It all runs locally over WebSerial, so device data never leaves your machine. See The Device Tab for the full guide.
The same workbench runs standalone via tendrl-dev-mcp in web mode (./tendrl-dev-mcp web), which is handy for bench work; see Where it runs.
Using an AI assistant (MCP)#
If you're using Claude, Cursor, or another MCP-compatible AI assistant with the tendrl-dev-mcp server, the AI can install the client for you:
write_config: writes your WiFi credentials and API key to the deviceinstall_client: the device connects to WiFi and downloads the SDK from your Tendrl server withmip
The AI handles the full setup: no manual file copying needed.
Using mpremote#
Install from your computer over USB: mpremote runs mip host-side and copies the precompiled packages to the board, so this works on every supported board (including OpenMV):
mpremote mip install --target=/lib https://app.tendrl.com/api/public/sdk/v1/latest/mpy/package.json
(On OpenMV, use --target=/flash/lib.)
Using the install script#
Download install_script.py and run it on the board. The script connects to WiFi and installs the SDK on-device using mip, fetching packages from the Tendrl server in the board's /config.json, so it runs on standard MicroPython (ESP32, Pico W, …) but not on OpenMV, whose firmware has no mip (use the serial/mpremote paths above instead).
The client ships as precompiled .mpy. To read the source of what's installed on a board, open the entity's Device tab; the file browser maps every installed .mpy back to its source.
Installation packages#
Flash figures are the on-device footprint under /lib/tendrl (/flash/lib/tendrl on OpenMV), measured from the vendored packages. Every Tendrl install path ships precompiled .mpy, so these are the bytecode sizes, roughly a third of the .py source they were built from. See Install paths by board:
| Package | Flash (.mpy) |
From source | Includes |
|---|---|---|---|
| Minimal (MQTT core) | ~55 KB | ~205 KB | Client, MQTT, networking |
| Files (add-on) | +~6 KB | +~18 KB | HTTP file transfer (send_file, clips) |
| Full (default) | ~74 KB | ~270 KB | Minimal + files + MicroTetherDB |
| OTA (add-on) | +~5 KB | +~23 KB | Remote app-code deploy (updater) with auto-rollback; see Remote Deployments |
| Streaming (add-on) | +~8 KB | +~25 KB | JPEG video streaming |
| Vision (add-on) | +~9 KB | +~41 KB | On-device detection (OpenMV only) |
Combined sizes: minimal + files ~60 KB, full + streaming ~81 KB, full + vision ~82 KB.
Set INSTALL_DB = False for minimal MQTT-only, INSTALL_FILES = True to add file transfer, INSTALL_UPDATER = True to add remote deploy (OTA), INSTALL_STREAMING = True for streaming, or INSTALL_VISION = True for on-device detection. The tendrl-dev-mcp install_client tool accepts minimal, full (default), files, ota, streaming, streaming-lite, or vision package names.
OTA is a standalone add-on: it isn't bundled into Full, so a board carries the updater only when you select it (the dashboard defaults it on for Full, opt-in for Minimal). ROMFS installs always include it.
Flash isn't the real budget; RAM is
On ESP32 (4 MB+ flash), storage is rarely the constraint. What matters is RAM.
Importing the same SDK build two ways on one board: same firmware, same version, install path the only variable.
| Install | Import | Resident | Free after |
|---|---|---|---|
.mpy on the filesystem |
917 ms | 64.7 KB | 80.1 KB |
| ROMFS | 411 ms | 19.1 KB | 125.7 KB |
Measured 2026-09-11 on an ESP32-C3: MicroPython 1.28.0, SDK 0.2.18, one board, one session per variant, from a common 144.8 KB baseline with boot.py and main.py moved aside. Two runs agreed to the decimal. ROMFS costs a third of the heap and imports in under half the time.
At boot the difference is starker still. A ROMFS install is already imported before any user code runs and holds 0.1 KB, because the code executes in place from flash and never enters the heap at all; the board comes up with 143.0 KB free, of which 112.9 KB is one contiguous block. The 19.1 KB above is what a later import allocates when it rebuilds the module dictionaries. Both are real, and quoting the second without saying "re-import" is how earlier versions of this table disagreed with the board-by-board page.
There is no .py source row because there is no way to get one. The public SDK endpoint serves exactly one variant, mpy, and any other 404s, so both install paths — install_script.py over the network and the serial push — deliver bytecode. Source on a device is a development artifact, not something a deployment can end up with.
Reproduce any of this with scripts/measure_heap.py in the SDK repo. It prints the machine, firmware, SDK version and install variant beside every figure, because without those four a number is not comparable to another run.
ROMFS wins outright. It runs bytecode in place from a read-only flash partition instead of copying it into the heap, so it holds 3.4x less memory, imports 2.2x faster, and leaves 45.6 KB more free than the same build on the filesystem. On a board with roughly 145 KB to play with, 45.6 KB is the difference between having room for a TLS handshake and not. It's ESP32-only and opt-in; see why, and Supported boards for the per-board figures.
The vision extension needs the OpenMV csi/sensor module (and ml for the model detectors). It will not run on an ESP32.
Configure (One File)#
Create /config.json on the board:
{
    "api_key": "your_entity_api_key",
    "wifi_ssid": "YourNetwork",
    "wifi_pw": "YourPassword"
}
That's all the setup. The client discovers everything else (MQTT broker, topics, entity info) from your API key automatically.
Your First Message (3 Lines)#
from tendrl import Client

client = Client(debug=True)
client.start()
client.publish({"temperature": 25.5, "humidity": 60}, tags=["sensor"])
When you call start(), the client automatically connects to WiFi, syncs time via NTP, fetches entity info, and connects to the MQTT broker. Your message is batched and delivered.
Automate with Tether#
Most embedded work is "read sensor, publish, sleep, repeat." The @tether decorator handles this pattern in one line:
@client.tether(tags=["sensor", "environment"])
def read_sensors():
    return {
        "temperature": sensor.temperature(),
        "humidity": sensor.humidity(),
        "battery": adc.read() * 3.3 / 4095
    }

while True:
    read_sensors()  # Return value is published automatically
    time.sleep(10)
Your sensor function stays clean: just return the data. The SDK serializes it, batches it, and delivers it over MQTT.
Tether with Offline Backup#
Network drops happen on embedded devices. Add write_offline=True and readings are stored locally until connectivity returns:
@client.tether(tags=["critical"], write_offline=True, db_ttl=3600)
def critical_reading():
    return {"voltage": 3.3, "current": 0.5}
No data loss. No retry logic. The SDK uses a BTree database that works within microcontroller memory constraints.
Route Inbound Messages#
Handle messages sent back to your device from Contact flows or other entities. Use @client.on() to route by tag or msg_type, the inbound counterpart to @client.tether():
client = Client(debug=True)

@client.on(tag="diagnostic")
def run_diagnostics(message):
    report = self_test(message.get("data", {}))
    client.publish(report, tags=["diagnostic-result"])

@client.on(tag="ai-response")
def handle_ai_reply(message):
    print("AI:", message.get("data", {}).get("response"))

@client.on(tags=["alert", "anomaly"])
def handle_alert(message):
    print("Alert:", message.get("data"))

client.start()
Register specific routes before broad ones, since the first match wins.
Track Device State#
Persist device state that's accessible from the dashboard and other entities:
client.update_state({
    "firmware": "1.2.0",
    "status": "active",
    "last_reading": 25.5
})

# Replace the whole table instead of merging:
client.replace_state({"firmware": "1.2.0", "status": "active"})
Receive remote state changes with @client.on_state:
@client.on_state
def on_remote_state(state):
    if state.get("status") == "needs_maintenance":
        run_diagnostics()
The client can _write_ state (update_state merges, replace_state overwrites) but has no on-device read. To read the current state back, use the REST endpoint GET /api/entities/status-table (see State Table).
Stream Video (OpenMV)#
Camera-equipped boards can stream JPEG video to Contact with one call:
client = Client(mode="async", debug=True)
client.start()
client.start_streaming(target_fps=15, quality=80, framesize="QVGA")
What You Get for Free#
When you call client.start(), the client automatically:
- Connects to WiFi/Ethernet and retries on failure
- Syncs time via NTP (required for message timestamps)
- Discovers MQTT broker details from your API key
- Batches messages with memory-aware sizing (adapts to available RAM)
- Stores offline messages in a BTree database when the network is down
- Sends heartbeats with memory and disk stats
- Reconnects automatically when the MQTT connection drops
You don't configure any of this. It just works on a microcontroller.
Complete Example#
from tendrl import Client

client = Client(debug=True)

@client.on(tag="ai-response")
def on_ai_response(message):
    print("AI:", message.get("data", {}).get("response"))

@client.on(tag="diagnostic")
def on_diagnostic(message):
    client.publish(self_test(), tags=["diagnostic-result"])

@client.tether(tags=["sensor"], write_offline=True)
def collect():
    return {"temperature": 25.5, "humidity": 60, "battery": 3.7}

client.start()

try:
    while True:
        collect()
        time.sleep(10)
except KeyboardInterrupt:
    client.stop()
Sync vs Async Mode#
Sync (default) uses a hardware timer for background MQTT. It works on all boards and is the simplest setup.
Async uses the asyncio event loop, required for video streaming and when integrating with other async tasks:
from tendrl import Client

async def main():
    client = Client(mode="async", debug=True)
    client.start()

    @client.tether(tags=["sensor"])
    async def collect():
        return {"temp": 25.5}

    while True:
        await collect()
        await asyncio.sleep(10)

asyncio.run(main())
What's Next#
- Configuration: All config options, WiFi, and memory tuning
- Examples: DHT sensors, streaming, database ops, and more
- MicroTetherDB: Embedded database with TTL, tags, and queries
- API Reference: Full method documentation
- Tendrl CLI: the full account plane — entity registration, messages, dashboards, IAM — when you need more than the device SDK covers
