 Tendrl
Vision Playground
Writing a detector is easy. Knowing what threshold to use is not, since it depends on what your scene actually looks like, at this angle, in this light, at 3pm on a gray Tuesday. The usual loop is edit, flash, wait, guess, repeat.
The Vision playground replaces that loop with a slider. Point the camera, drag a box around the thing you care about, and watch the measured number move against your threshold while you change the scene by hand. When it behaves, export the file.
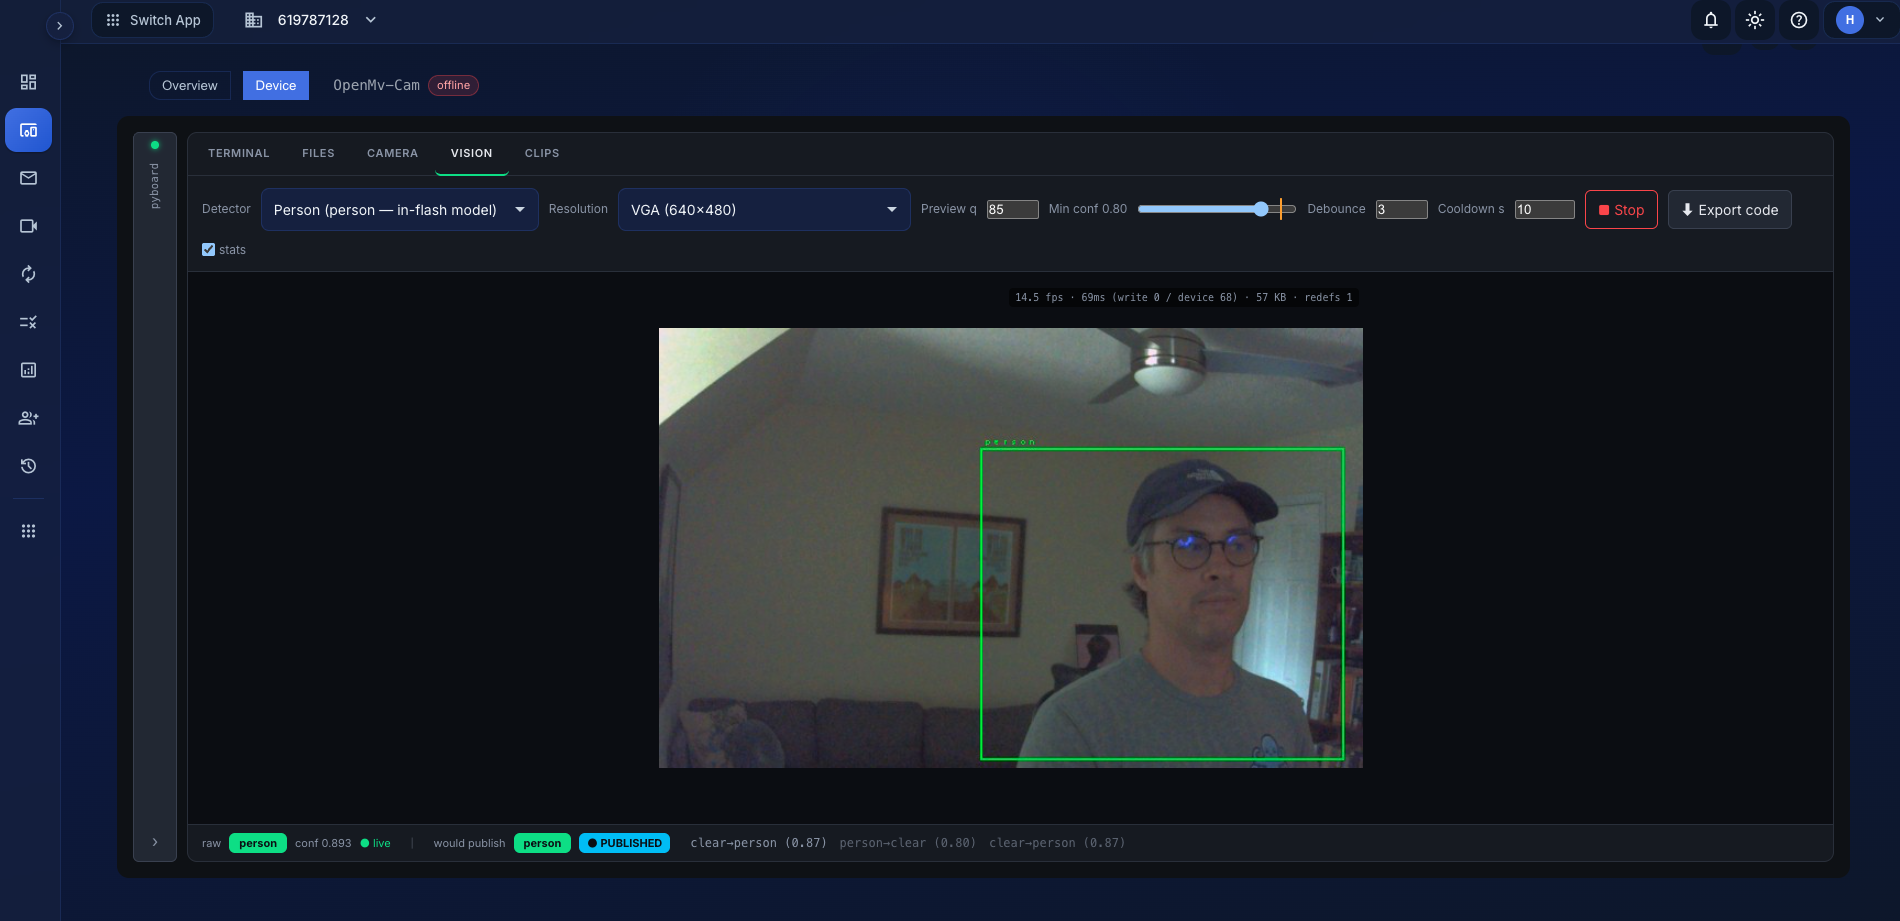 Tune against the real scene, on the real hardware.
Vision needs the OpenMV csi/sensor module, and the model-based detectors additionally need ml. It does not run on an ESP32. See the vision extension for the SDK side.
It's the real detector#
This is the part that makes it trustworthy: the detectors run on the board. Each tick captures a frame, runs the chosen detector from the actual tendrl.vision code, and sends back both the verdict and the exact JPEG it judged. Nothing is reimplemented in JavaScript, so a threshold that works here works when you deploy it.
The detectors#
| Detector | Tunes with | Good for |
|---|---|---|
Brightness (roi_brightness) |
A region you drag, plus a threshold | A region gets lighter or darker, such as pot empty, tank level, shelf stocked, bin full, gate open |
Color blob (color_blob) |
Click the color in the frame, then a tolerance | Indicator lamps, status LEDs, signal towers |
Motion (motion) |
A sensitivity threshold | Driveways, trap cams, after-hours activity |
Person (person) |
A minimum confidence | Someone is there. Uses OpenMV's in-flash model, nothing to train or fit |
Face (face) |
A minimum confidence | A face is in frame. Draws the six facial keypoints (eyes, nose, mouth, ears) |
Hand (palm) |
A minimum confidence | A hand is in frame, with a 7-joint outline |
Hand skeleton (hand_landmarks) |
A minimum confidence | All 21 joints per hand, labeled left/right, including fingers and fingertips |
The first three need no model, no training data, and no heap for weights. Reach for those first; they cover far more real problems than people expect.
The in-flash models#
Person, face and hand detection all use models that ship inside OpenMV firmware: there is nothing to train, nothing to upload, and no dataset to collect. That is the whole point: you point a camera at something and it works.
Because they come from the firmware, which models exist varies by board and OpenMV version. The playground reads the board's model directory when it connects and disables any detector this firmware can't run, with the reason on the option itself, rather than letting it fail when you press Start.
Hand detection likes an NPU
palm and hand_landmarks are bigger models. On a board with an NPU (OpenMV AE3 or N6) they're quick; without one they still run, just slowly. face is the small one and is the best first thing to try anywhere.
hand_landmarks is two models in series: it finds the hand, then runs a second model on a crop around each hand, so it costs one extra inference per hand and holds both models in memory at once. If you only need "is there a hand", pick Hand instead.
These models are trained on square input and detect noticeably worse on a 4:3 frame, so at VGA the playground windows the camera to a centered 400×400 square, and bakes the same window into the exported file, so what you tune is what you deploy. At other resolutions they run on the full frame instead: sensor windowing is much more restricted than plain capture, and asking for a window a sensor won't give either errors outright or silently returns a different shape. If a model detector is finding less than you expect, switch to VGA first.
Tuning#
Drag an ROI directly on the frame to restrict brightness detection to the region you care about. No box means the whole frame.
Watch the readout. The measured value is shown against your threshold with a marker, so you're picking a number between two observed values rather than guessing one. Cover the thing, uncover it, and put the threshold in the gap.
Pick a color by clicking it in the live frame for blob detection; the tolerance slider widens the match around that pick.
An optional stats overlay shows live fps and per-tick timing, so you can see what the detector costs on this board at this resolution.
Resolution and memory#
The playground picks a default framesize your board can carry, budgeting for the frame buffer plus the model arena when a model detector is selected, with headroom for OpenMV's double-buffering. It won't offer a size that doesn't comfortably fit.
The arenas differ a lot between models: measured on an AE3, face needs roughly 390 KB while the two-model hand skeleton needs about 1.8 MB, so switching detector can change which resolutions are safe. The warning follows the detector you have selected.
Changing resolution restarts the board. Re-initialising a camera that is already running is only safe once per session on some boards; do it twice and an AE3 stops responding entirely, needing a physical reset. So a resolution change soft-resets the device and sets the camera up fresh. It costs a second or two and clears anything the device had loaded; switching detector does not do this and stays instant.
Sensors sometimes reject a size for reasons no memory calculation predicts, and it goes both ways: some chips refuse the smallest sizes as readily as the largest (the AE3's sensor won't do QQVGA at all). Known chip limits are flagged in the dropdown up front. Anything else is learned the first time it fails: the size is marked as rejected and remembered for that board, in both the Camera and Vision tabs, so you can't pick it blind again. Use clear under the dropdown to forget those and try everything again.
The free-heap figure the warnings use is read when the board connects, and OpenMV boards don't reset when you plug them in, so anything a previous script left loaded (a model's tensor arena is easily a megabyte) is still counted as used. If a size looks like it won't fit, reset the board and reconnect before believing it.
Bigger isn't better here: the detectors downsample internally, so resolution above VGA buys nothing for detection.
The publish simulator#
This is the part people don't expect, and it's the most valuable thing on the page.
A raw detector flips on every shadow, every passing cloud, every bad exposure. What you deploy isn't the detector: it's Watch, which decides which verdicts are worth a message. The playground shows both, side by side: the raw detector state on the left, and what Watch would actually publish on the right, with a running list of simulated events.
Two controls shape it:
- Debounce: how many consecutive agreeing frames a change needs before it counts. Single-frame flickers never make it out.
- Cooldown: the minimum seconds between published changes. A change that comes due mid-cooldown is deferred, not dropped.
And the rule underneath: it publishes on transitions only. While the scene is stable, the device sends nothing at all, not a frame, not a heartbeat. The simulator is a mirror of tendrl.vision.Watch.update(), so the event list you see is the event list you'll get.
Tune debounce and cooldown here, against your real scene, until the event list looks like something you'd be happy to receive for a year.
Export#
⬇ Export code writes a complete, deployable vision_watch.py into the Files editor with every setting baked in: detector, threshold, ROI, framesize, debounce, cooldown. Two flavours:
- Deploy (headless): watches and publishes. No video anywhere. This is what goes on the device.
- Debug: the same file plus
preview.frame(), so running it from Files streams live frames back to the Camera view. Remove that line for production.
The generated file looks like this:
# Generated by the Tendrl Vision playground, tuned on real hardware.
from tendrl import Client
from tendrl.vision import Camera, Watch, roi_brightness

cam = Camera(framesize="VGA")
client = Client(mode="sync")
client.start()
time.sleep(5)

watch = Watch(
    client,
    detect=roi_brightness(roi=(120, 80, 60, 90), threshold=0.45, states=("full", "empty")),
    debounce=3,
    cooldown_s=10,
    tags=["my-watcher"],   # route this to a Contact flow / Strand workflow
)

# Publishes only when the state changes, nothing while the scene is stable.
while True:
    watch.update(cam.snapshot())
    time.sleep_ms(500)
Change tags to something meaningful and you're done: a flow or a Strand workflow keyed on that tag turns the state change into a Slack message, a ticket, or a page.
Save it as main.py and reset the board, and it runs on boot.
