 Tendrl
Provisioning a Device
Provisioning is the step that turns a board running MicroPython into this entity's device: it writes /config.json with the entity's API key and your Wi-Fi details, installs the Tendrl SDK at the tier you choose, and resets the board.
Every Tendrl install path ships precompiled bytecode, so no board ever parses .py at import. ESP32 boards can additionally use the low-RAM ROMFS install. See Install paths by board.
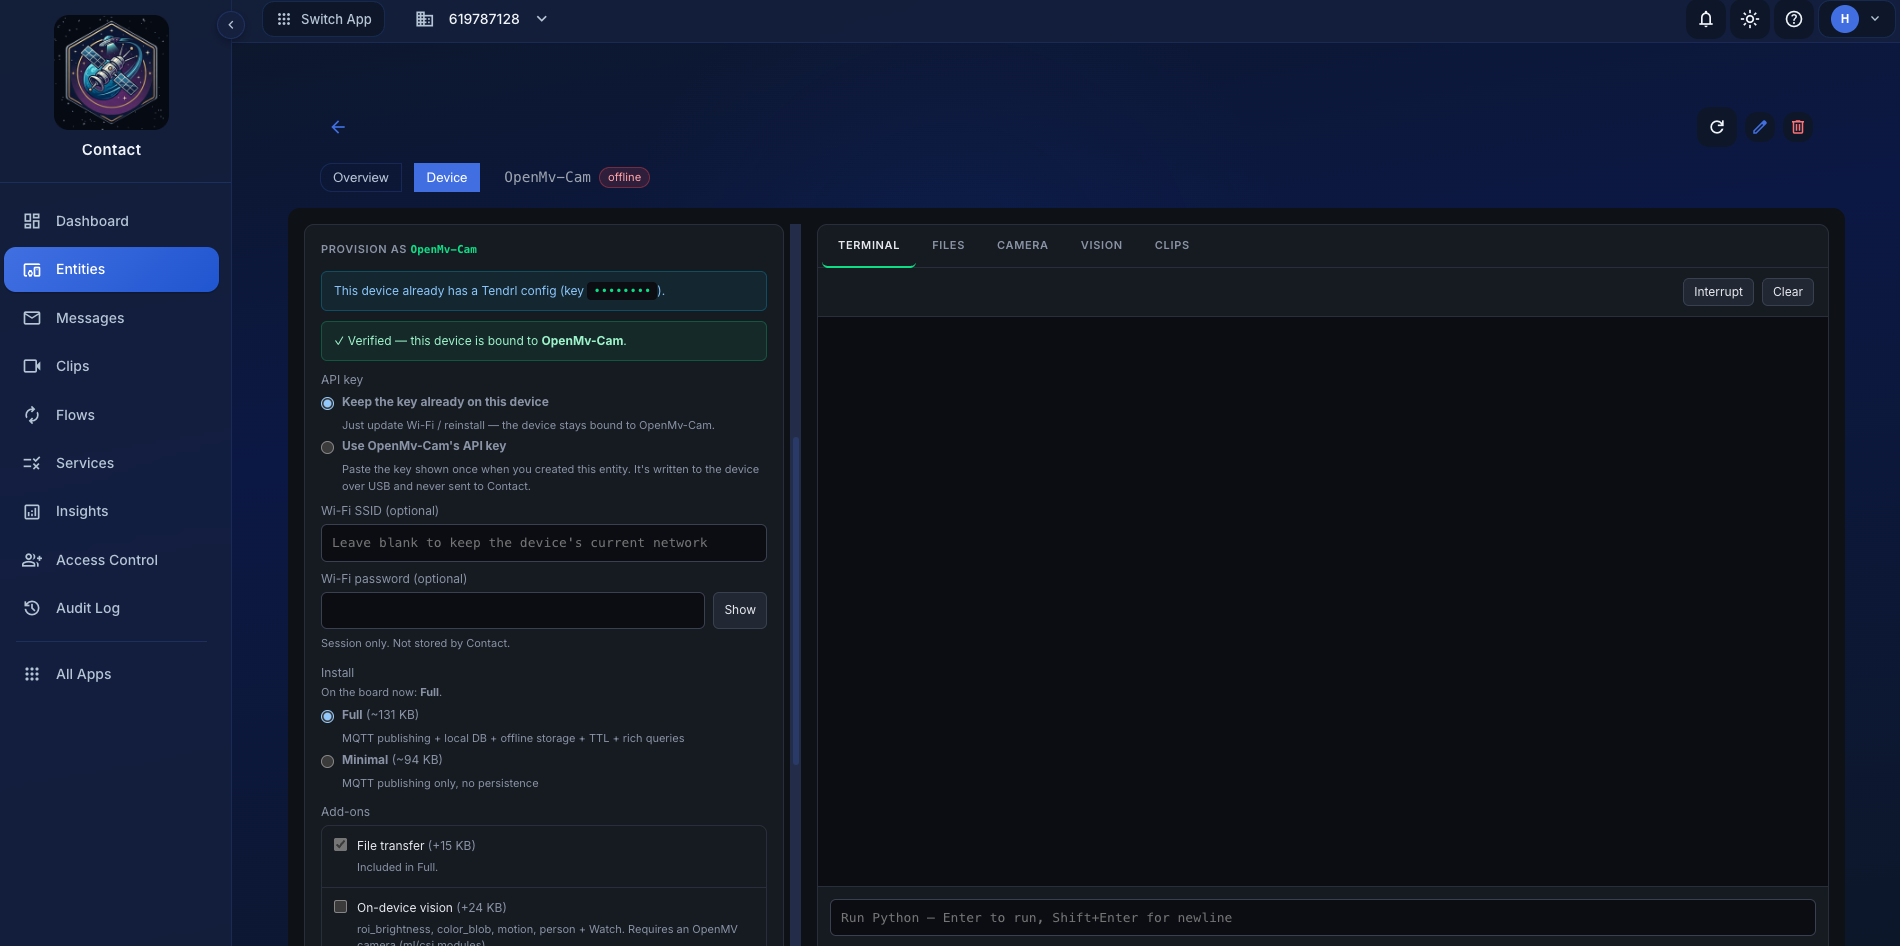 The provisioning form, with a summary of exactly what will change.
The API key model#
Each entity has exactly one API key, issued when the entity was created and shown once. Provisioning writes that key to the device; it never mints a second one.
The key is optional: you can flash firmware, install the SDK, and set Wi-Fi now, then add the key later. Leaving it blank never overwrites a valid key already on the device.
On connect, the tab reads the board's existing /config.json and picks the flow for you:
- The device already holds this entity's key: nothing to paste. You can keep it and just update Wi-Fi or reinstall the SDK.
- The device holds a different key, or none: paste the entity's key (or leave it blank for now). Contact validates that a pasted key belongs to this entity, then the browser writes it to the board over the serial port. A key that provably belongs to a different entity is refused.
Validation checks the key's identity against the entity. The secret itself goes from the form straight down the USB cable. The same is true of the Wi-Fi password: it is session-only, and Contact does not store it.
Lost the key? Use Rotate in the form to reissue the entity's key inline. This is gated by your provisioning permission on the entity, so you don't need account-level API key rights to do it. Rotation invalidates the old secret immediately, so any other device already running on that key stops working and must be re-provisioned.
Wi-Fi#
Fill in Wi-Fi SSID and Wi-Fi password, or leave them blank to keep whatever network the device is already configured for. Blank is the normal case when you're re-provisioning a device that's already on the right network.
Choosing the install path#
On ESP32 boards the form offers two ways to install the SDK:
| What it does | When to use | |
|---|---|---|
| Tendrl firmware (ROMFS) | Deploys the SDK as compiled bytecode to a read-only, memory-mapped flash partition, where it runs in place and never loads into the heap. | The default, and the one that wins outright. Measured on an ESP32-C3 (MicroPython 1.28.0, SDK 0.2.18), the client costs 19.1 KB of heap instead of 64.7 KB from the filesystem, peak during import drops from 76.7 KB to 26.5 KB, and it leaves 45.6 KB more free. At boot it costs 0.1 KB, because nothing is copied into the heap at all. |
| Existing firmware (filesystem) | Pushes the SDK into the filesystem at the tier you pick below, as precompiled .mpy on every board. |
When you want to keep the board's current firmware. |
With Tendrl firmware, if the board's firmware doesn't already have a ROM partition, provisioning flashes a ROMFS-enabled MicroPython build first. This erases the board, and you'll be asked to unplug and replug it for a clean boot before it continues. The whole SDK is baked in, so there are no tier or add-on choices to make.
On ESP32 (4 MB+ flash) the constraint is almost never storage; it's RAM. Importing .py source compiles to bytecode that lives in the heap alongside your program. ROMFS executes that bytecode straight from flash, so it doesn't compete with your app for memory. See Installation packages.
Install paths by board#
Which install you get is decided by the board, not by preference:
| Board | How the SDK is installed | Where it lands |
|---|---|---|
| OpenMV (H7, RT1062, AE3, N6) | Precompiled .mpy bytecode, pushed over serial |
/flash/lib/tendrl |
| ESP32 family | ROMFS image, or .mpy pushed over serial / fetched with mip |
ROM partition, or /lib/tendrl |
| Pico W and other standard MicroPython | .mpy over serial, or mip over Wi-Fi |
/lib/tendrl |
All three ship bytecode. To read the source of what's installed, open the entity's Device tab: the file browser maps every installed .mpy back to its source. (Running the client from .py source isn't a supported install path: it costs
Bytecode is version-coupled: .mpy format v6 needs MicroPython 1.19 or newer. The Device tab checks the board's format against the one it serves and refuses to install on a mismatch rather than leaving files the board can't import.
Two things follow from this that surprise people:
ROMFS is ESP32-only. OpenMV firmware does ship a ROM partition, but it arrives full of the camera's built-in ML models; that's what /rom holds. There's no free space for the SDK, and no way to erase just part of it, so the ROMFS install isn't offered on OpenMV.
Every board gets bytecode, and there is no source option. The public SDK endpoint serves exactly one variant, mpy, and 404s anything else, so both install paths — the network installer and the serial push — deliver compiled bytecode. Source on a device is a development artifact, not a state a deployment can reach. Compiling on the host means the board never parses .py at import; on an OpenMV AE3 that was 79 ms versus 524 ms when source was still installable. Bytecode installs re-install cleanly as many times as you like.
Why not ROMFS everywhere
ROMFS wins on resident RAM. Measured on an ESP32-C3 (MicroPython 1.28.0, SDK 0.2.18, two runs identical): it holds 19.1 KB against 64.7 KB for the same build on the filesystem, cuts peak-during-import from 76.7 KB to 26.5 KB, and leaves 45.6 KB more free out of a 144.7 KB baseline. At boot the resident cost is 0.1 KB, because the code executes in place and is never copied into the heap; the 19.1 KB figure is what a later re-import allocates rebuilding module dictionaries. On an OpenMV camera with megabytes free the saving would be about 1%, not worth the constraints.
Choosing a tier#
(Source install only: the ROMFS install always includes the full SDK, OTA updater included.)
Two base tiers, plus add-ons:
| What you get | |
|---|---|
| Minimal | The MQTT core: connect, publish, subscribe. No persistence. |
| Full | Minimal plus MicroTetherDB for local storage, offline queueing, and TTL. |
| Add-on | Notes |
|---|---|
| File transfer | send_file / check_files / download_file. Ships inside Full; selectable on Minimal. |
| Remote deploy (OTA) | The updater module: lets you push app code from the dashboard with automatic rollback (see Remote Deployments). On by default for Full, opt-in for Minimal, and uncheckable on either. A board without it can't receive remote deployments. |
| JPEG streaming | Camera streaming. Choose standard or lite. Requires async mode. |
| On-device vision | Detectors and Watch. OpenMV only: it needs the csi/sensor module, and the model detectors additionally need ml. |
The form preselects the tier the board's free heap can carry (see the tier recommendation). For flash footprints, see Installation packages.
What will change#
Above the button, the form shows a plain-English summary of the diff between what's on the board and what you selected: which packages get added, which get removed, whether the tier is changing. Two deploy modes control how that's applied:
- Sync changes: write only what's missing or has changed size, and delete what you deselected. Fast; a no-op selection writes nothing.
- Full redeploy: rewrite every selected file. The escape hatch when a file changed without changing size, or when the board is in an unknown state.
Installing used to be purely additive, so unchecking an add-on left its modules on flash forever. It doesn't any more. Deletion is bounded by the managed set (the union of every package manifest), so anything under lib/tendrl that no package claims is never touched. That includes the on-device databases (tendrl_tether.db, tendrl_client_db.db) and any module you put there yourself.
What runs#
Provisioning reports each step live, with a log:
(ROMFS only, if needed) Flash Tendrl firmware
erases the board and writes a ROMFS-enabled MicroPython build, then pauses for you to unplug and replug before reconnecting.
Install the Tendrl SDK
for ROMFS (ESP32), the compiled .romfs image is deployed to the board's ROM partition over serial. Otherwise precompiled .mpy files are pushed over serial with a progress bar, to /flash/lib/tendrl on OpenMV, /lib/tendrl elsewhere. On boards that have mip and Wi-Fi, the SDK can instead be fetched over the network.
Write /config.json
the API key (if provided), Wi-Fi, and the MQTT connection details for your environment. On OpenMV the config root is /flash; everywhere else it's /. Under ROMFS the config lives on the writable filesystem, not the read-only ROM partition.
Reset device
the board reboots and starts running the client.
Why there are multiple install paths#
mip downloads packages onto the device over Wi-Fi from your Tendrl server. OpenMV's MicroPython firmware doesn't include mip, so on OpenMV the mip install path can't run at all. Where the SDK can be pushed over serial, the tab does that instead: no mip, no network needed on the device. The ROMFS path is different again: it deploys one compiled image to a flash partition for the lowest RAM footprint (see Choosing the install path).
When neither path is available, the form tells you and gives you the mpremote commands to run from your computer, which copy the files over USB:
mpremote connect auto mip install --target=/flash/lib https://app.tendrl.com/api/public/sdk/v1/latest/mpy/package.json
After provisioning#
The board resets and starts the client. Open the Terminal to watch it come up: you'll see the Wi-Fi join and the MQTT connect. If it doesn't, Troubleshooting covers the usual causes.
